Choosing your OER Tools: A Tool Look Book
4.15 Pressbooks FAQs
Theresa Huff and Karna Younger
Below you will find questions asked and answered during the Pressbooks Jam Session, during one-on-one meetings, or via email with faculty. Thanks for your excellent questions!
Questions about getting started
Q: What course name should we put in the Pressbooks Interest Form?
A: In the Pressbook request form, you can add all of the courses in which you plan to use the OER, separated by a comma.
Q: What’s the style of the chapter?
A: Styles are built-in word formats in a text editor. For example, in Microsoft Word some styles include Heading 1, Heading 2, and Body text. These aid in screen reader navigation and graphic organization of text.
In Pressbooks, the styles (and fonts) are embedded within the Theme you choose. Each theme includes Paragraph (similar to Body font in Word), Heading 1, Heading 2, Heading 3, etc. By default, the title of the chapter (which appears in the red box at the top of the chapter in Edit mode) will appear in the Table of Contents and is a Heading 1 style.
Ideally, you want to set your headings in a hierarchical manner (Chapter title is Heading 1, Major section titles of the page are Heading 2, subsections of each section are Heading 3, etc.). This supports screen reader accessibility.
Q: Where is the email to confirm my invitation to my Pressbook?
A: You might check your Spam folder of your email. If you cannot find the email from Nataly, please reach out, and we will ensure you get access.
Q: Are the faculty members expected to add their content to the Pressbook? Or will there be someone else to help?
A: The OER Instructional Designer (Theresa) is always here to help you with all the technology and instructional design support for your OER. She can offer training on the platforms and technologies, mock-up examples of technology uses, and troubleshoot issues you run into. She can also offer guidance for best practices for making your OER accessible, instructionally sound, and interactive. However, the actual content creation belongs to each faculty team, and the stipend offered through the grant is in part to cover the time and effort involved in the work of creating an OER.
Suggestion: It’s always ok to set up one-on-one trainings for individuals and teams to ask if Theresa has time to mock-up something or streamline a process.
Discuss with your team if the workload can be organized so that those who would prefer to work more in one area of OER development (formatting the Pressbook, writing content, creating videos, uploading images, etc.) can hand other areas of OER development to others on the team.
Consider offering some of the manual work (copy/pasting/formatting to student workers for pay and/or as co-creators and co-authors of the OER.
Q: Do things copy over better from Word docs than from Google docs?
A: Not necessarily. Both Word and Google docs can include formatting that will not copy/paste neatly into Pressbooks. Word docs can be imported/uploaded directly into Pressbooks, but Google docs cannot. However, you can copy/paste from either.
Suggestion: A best practice for bringing in text-based content is to select all of the content in the Word or Google doc and remove the formatting. This will get rid of any formatting in the html (backside) of the document that might get messy once brought into Pressbooks. Once pasted into Pressbooks, the formatting (headings, tables, etc.) can be added using Pressbooks’ text editor.
Q: In the Pressbooks Sandbox, I don’t have the option for themes under appearance. I’m not seeing “themes,” just “theme options” under the McLuhan theme…
A: This has to do with the role of “Editor” rather than “Administrator”. Once your Pressbook for your OER has been created, Nataly will add each team member to the Pressbook and give them the “Administrator” role. This will allow you to see and edit the Appearance of your Pressbook.
View the different roles and their abilities
Q: Can we change the color schemes after we add content?
A: Yes, the color schemes and other Themes or Theme Options can be changed at any time. Changing these should not alter your content.
Read more about Appearance – Pressbooks User Guide
Q: Is the team lead the book administrator and the rest of the team editors?
A: You can have more than one administrator in a Pressbook. As a team, you can decide the role you wish each member and/or other collaborators to have.
View the different roles and their abilities
Q: How do you rename “Parts” and “Chapters”? In my class, I would call them “Modules” and “Chapters” or “Chapters” and “Pages”.
A: You can change what is being referred to by default as “Parts” and “Chapters” for your students. Keep in mind, this will only show to your students once the Pressbook is published. While you are building your Pressbook, you will still see “Parts” and “Chapters”. View the video below for steps on how to change the names.
For more information, see the Pressbooks User Guide under Global Options < Parts and Chapter Labels.
Questions about editing
Q: Can only one member edit at a time? It’s telling me another team member is editing and do I want to “Take Over”.
A. More than one person can edit within a Pressbook at a time. However, within a chapter, only one person can edit at a time. If you try to edit a chapter in which another person is currently editing, you will see the message “[Team member’s name] is currently editing this chapter. Do you wish to take over?” If you choose to take over, the other person’s work may be lost.
Suggestion: To mitigate the risk of losing your work, you can create your text on a Word document or Google doc saved to your desktop or team’s Google folder. Pro tip from one team: type your content in a Google doc and link the Google doc into your team’s Table of Contents or OER Content and Assessment map in your Deliverables spreadsheet.
Q: So, the content doesn’t save automatically, right (like a Google Doc), you have to hit “save”?
A: Pressbooks is supposed to autosave every 60 seconds. However, it is always a good practice to save your page often. The red Save button is located at the bottom of the page. You can also see all of the different saved and autosaved versions in a list at the bottom of the page and can choose to revert to one of those at any time. If you try to navigate away from a page without saving, Pressbooks will pop up a message asking you if you want to leave without saving.
Questions about images
Q: What’s the difference between an image description and Alt Text?
A: While both support accessibility for users, typically the Alt Text is a very brief description that describes the purpose of the image while the image description deeply describes (paints a picture of) the image for blind/low vision folks.
More on the difference between alt text and image description
Suggestion: Arizona State University has a great AI tool that can help you and your team immediately create Alt text, image descriptions, and captions for your images. Simply upload the image and select Create Image Details. Once the AI generates your Alt text, image descriptions, and captions, you will (as will all AI output) want to check if for accuracy. Then, you can simply copy/paste each into the metadata areas of the images you plan to use in your Pressbooks
More on adding images to your Pressbook
Q: Would the title be the figure number or something else?
A: The title of an image would be the title the creator gave to it (it is the “T” in the TASL which you will want to gather for any image you plan to use in your OER. Sometimes the author did not give its creation a name, and the name is just the name of the file (Example: mydog.jpg). If you created the image, you can give it a title yourself and choose a CC license if you’d like.
Suggestion: You can add a figure number to your caption. You could add another column in your Images and Figures spreadsheet to keep a primary list of images and associated numbering that aligns with your table of contents.
Q: How do I allow viewers to enlarge the images in my Pressbook?
A: Images in your Pressbook chapters can be enlarged when users select them if they are linked through a url either in your Pressbook (if the image is uploaded to the Pressbook) or to the url of the image (if it is hosted on the internet or in another Pressbook).
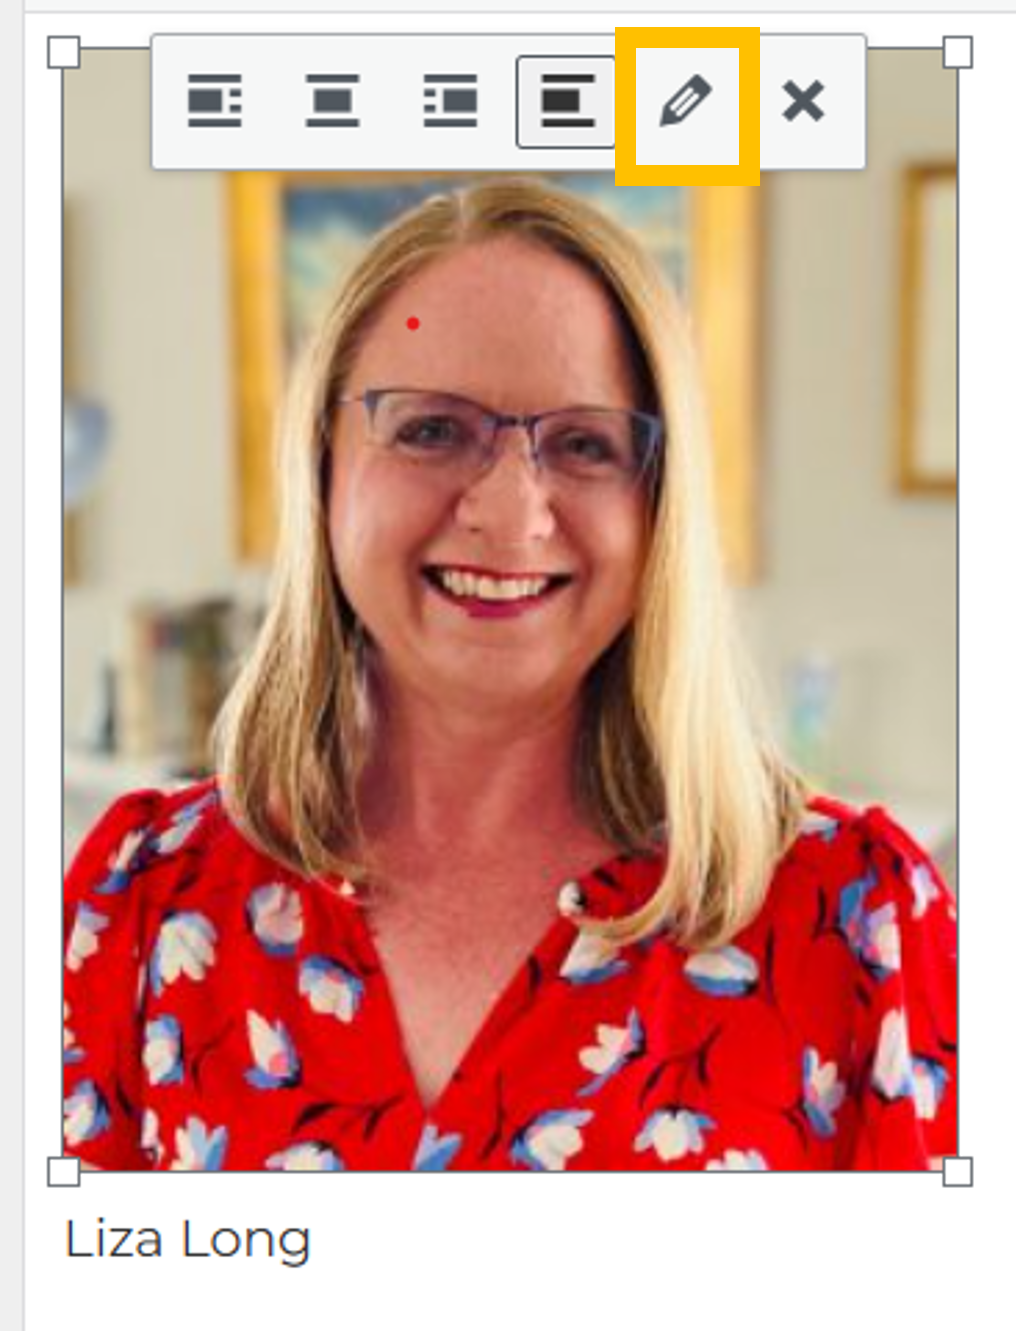
In the Edit mode of your Pressbook chapter, select the image. Then, select the editing pencil.
If the image is uploaded in the Pressbook’s Media Library already:
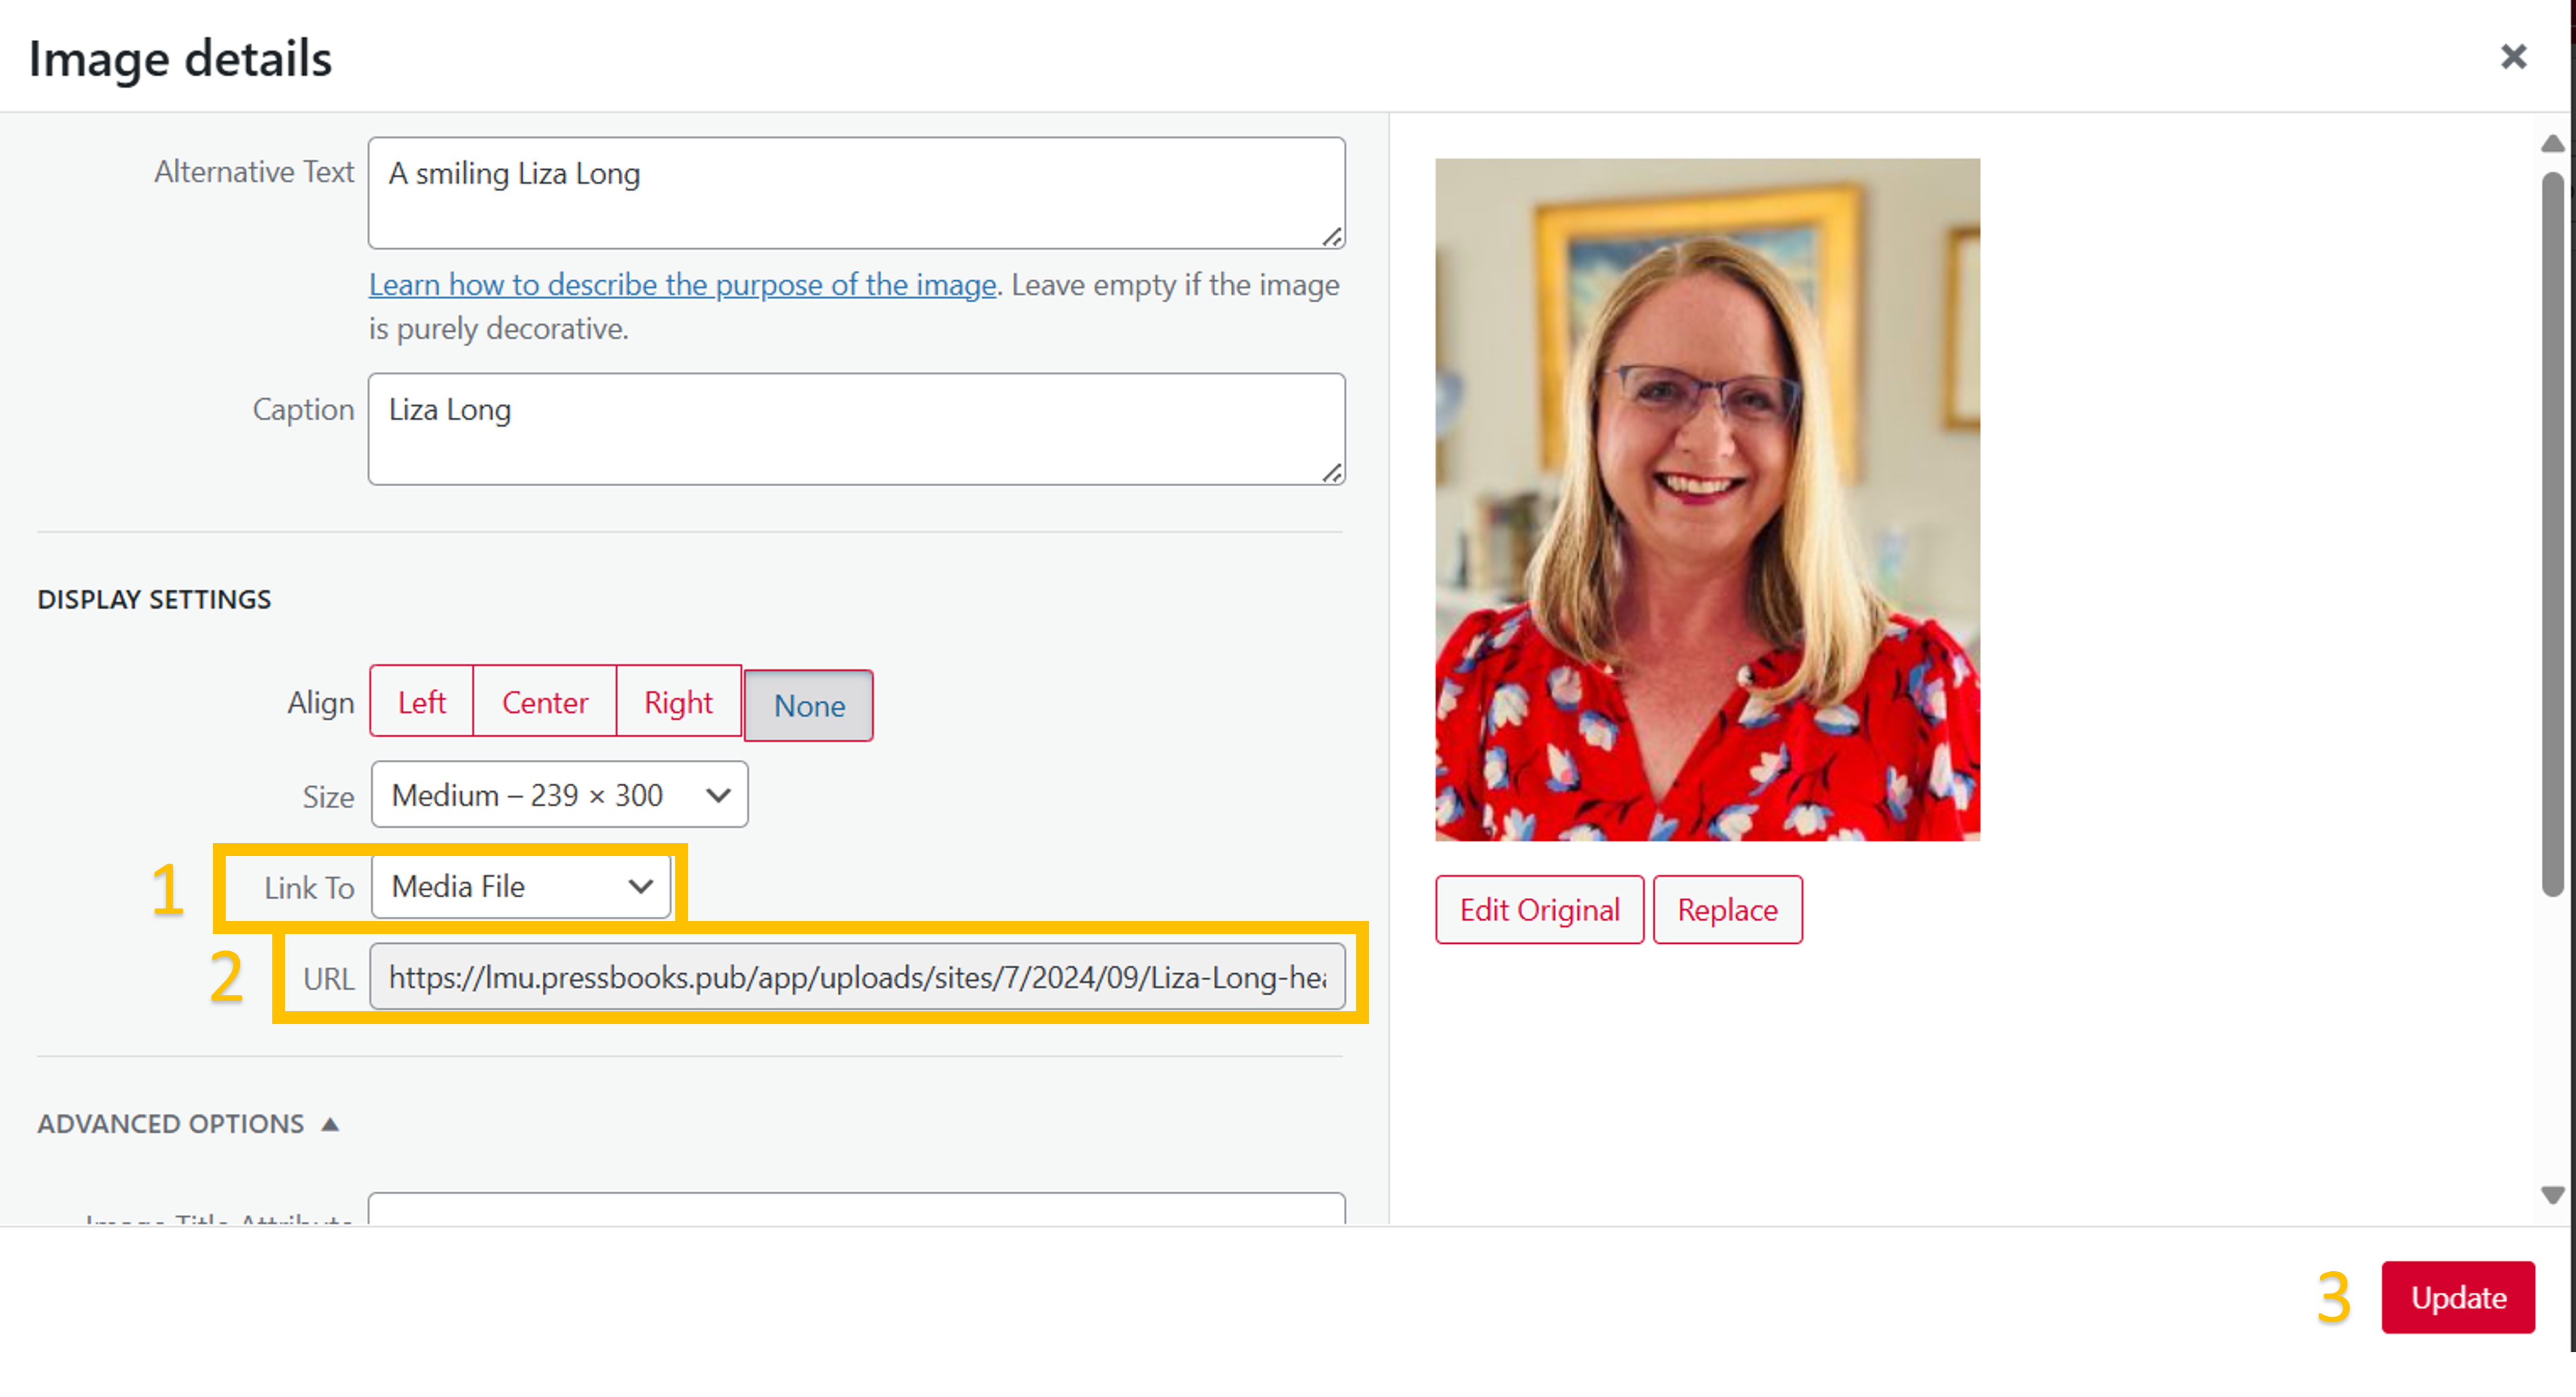
Under Display Settings, select Link To: Media File [1]. The URL for the image will appear in the URL text box [2]. Select Update [3].
Your image will now enlarge when selected.
If the image is hosted elsewhere on the internet or in another Pressbook:
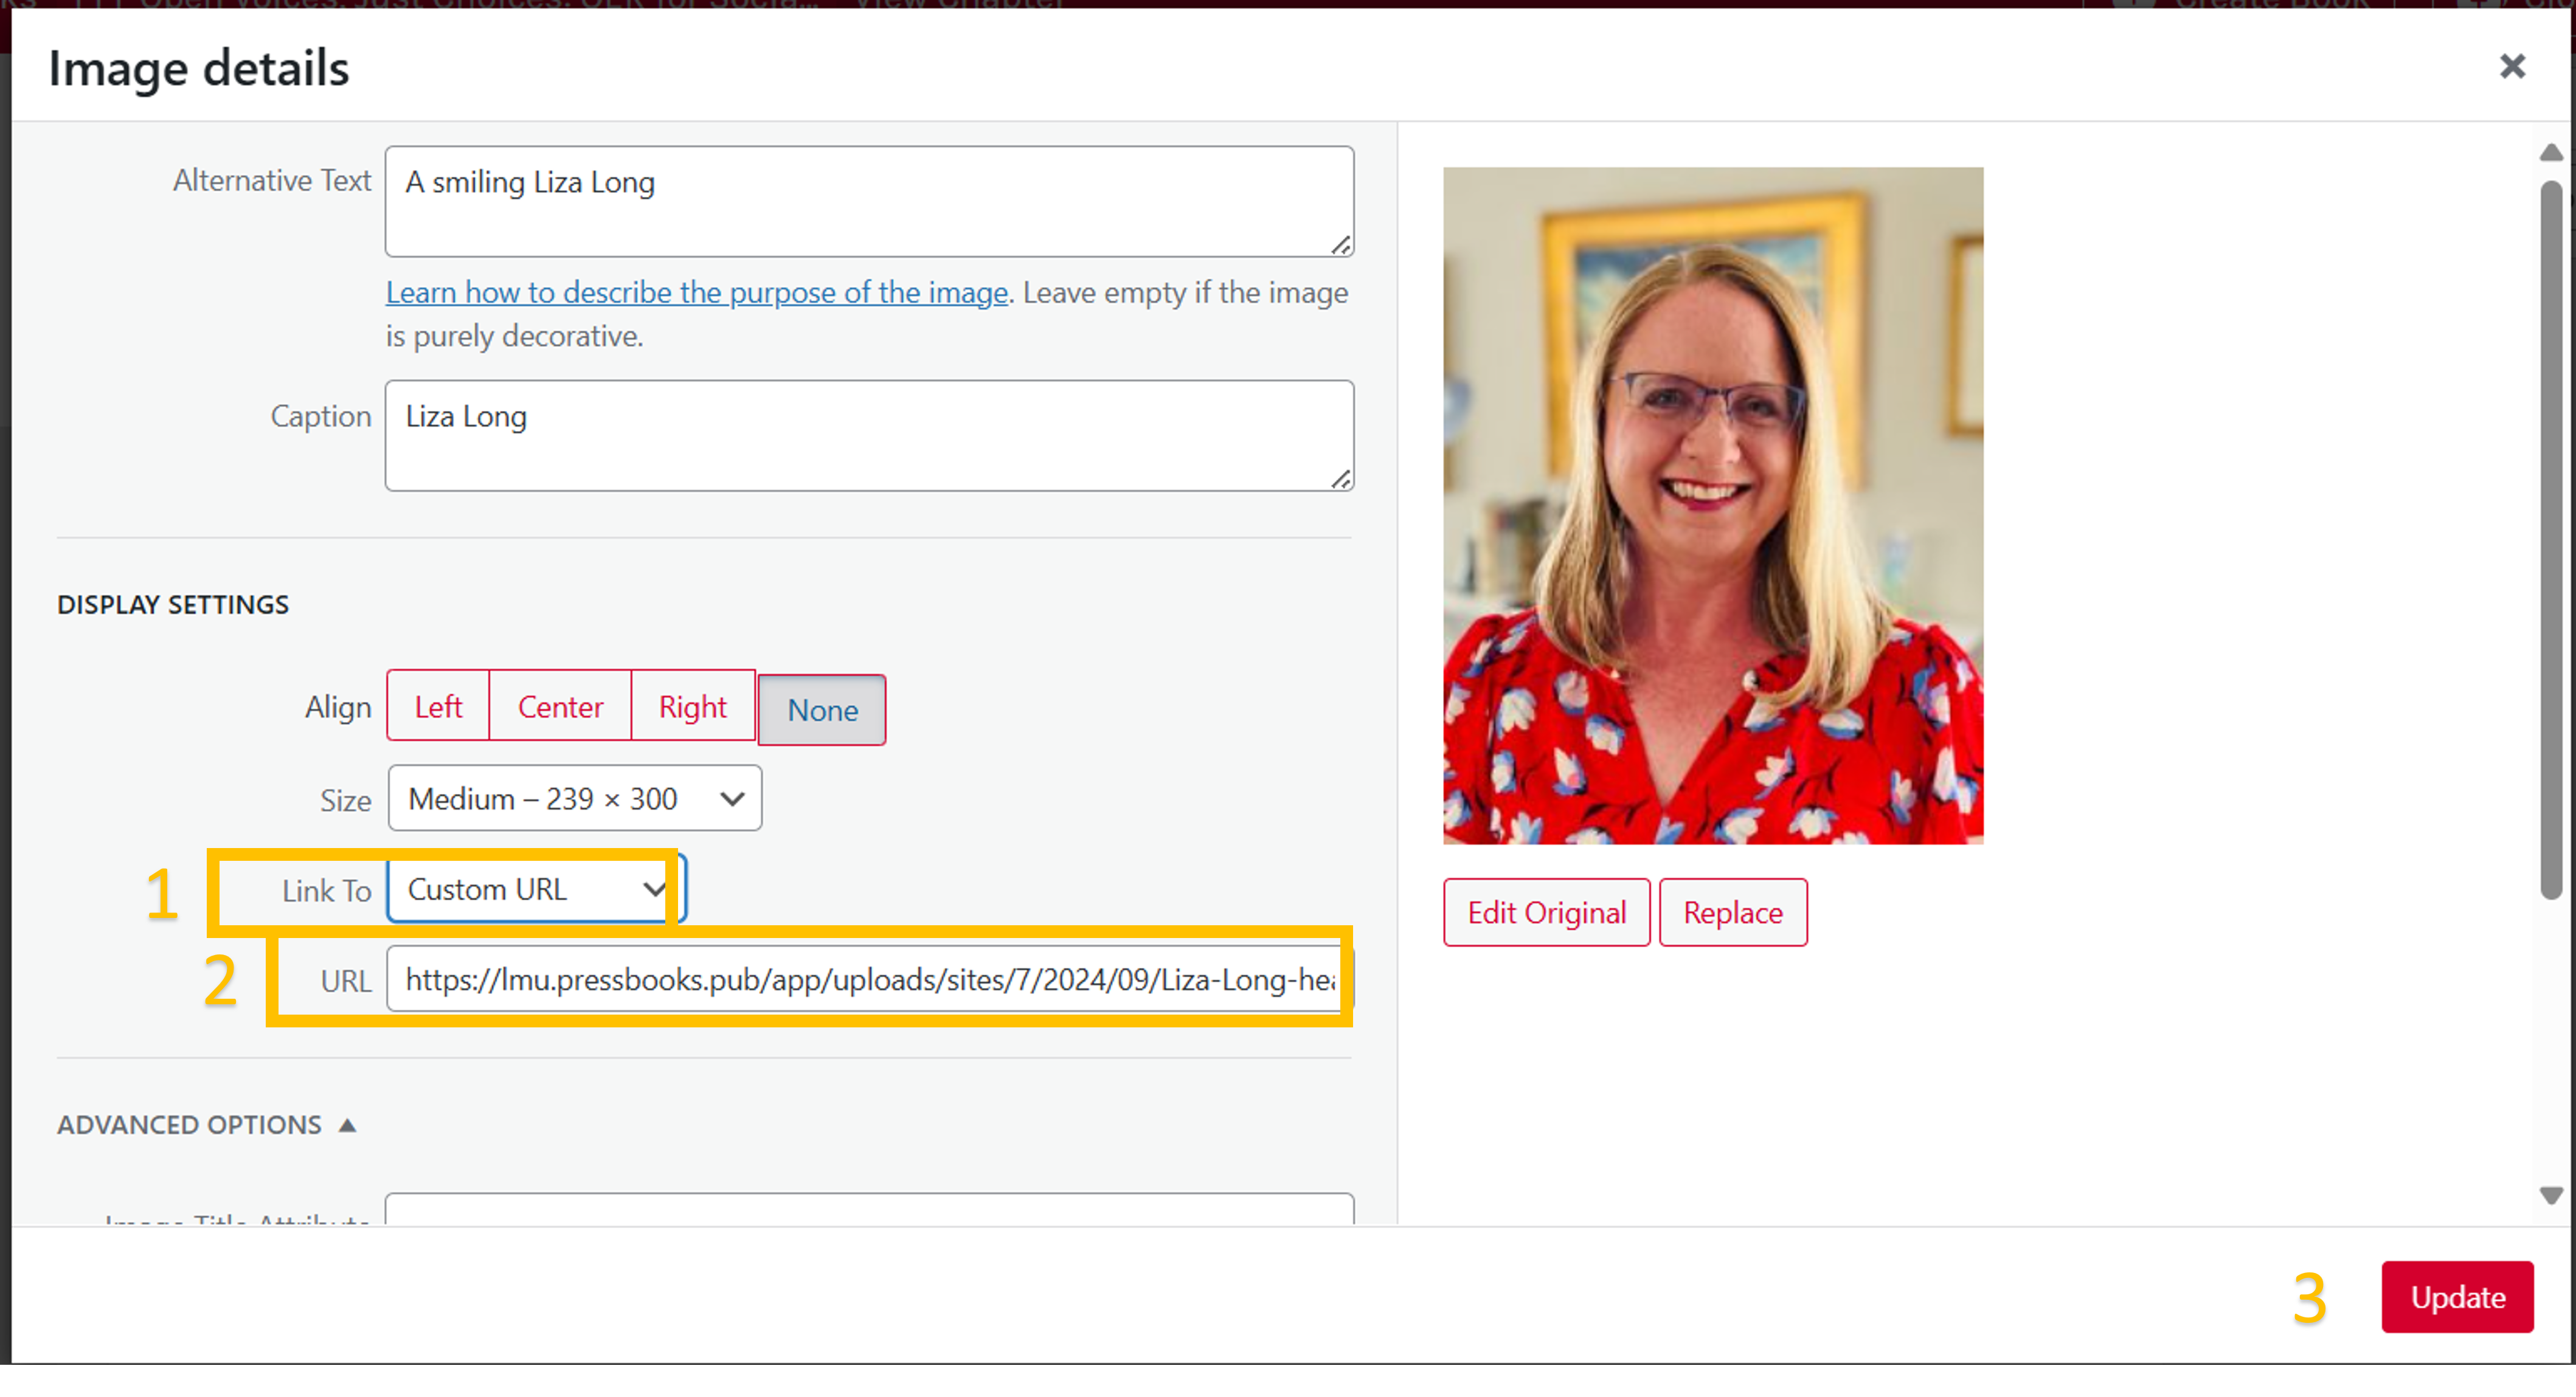
Under Display Settings, select Link To: Custom URL [1]. In the URL text box, paste in the image’s URL from its hosting site [2]. Select Update [3].
Your image will now enlarge when selected.
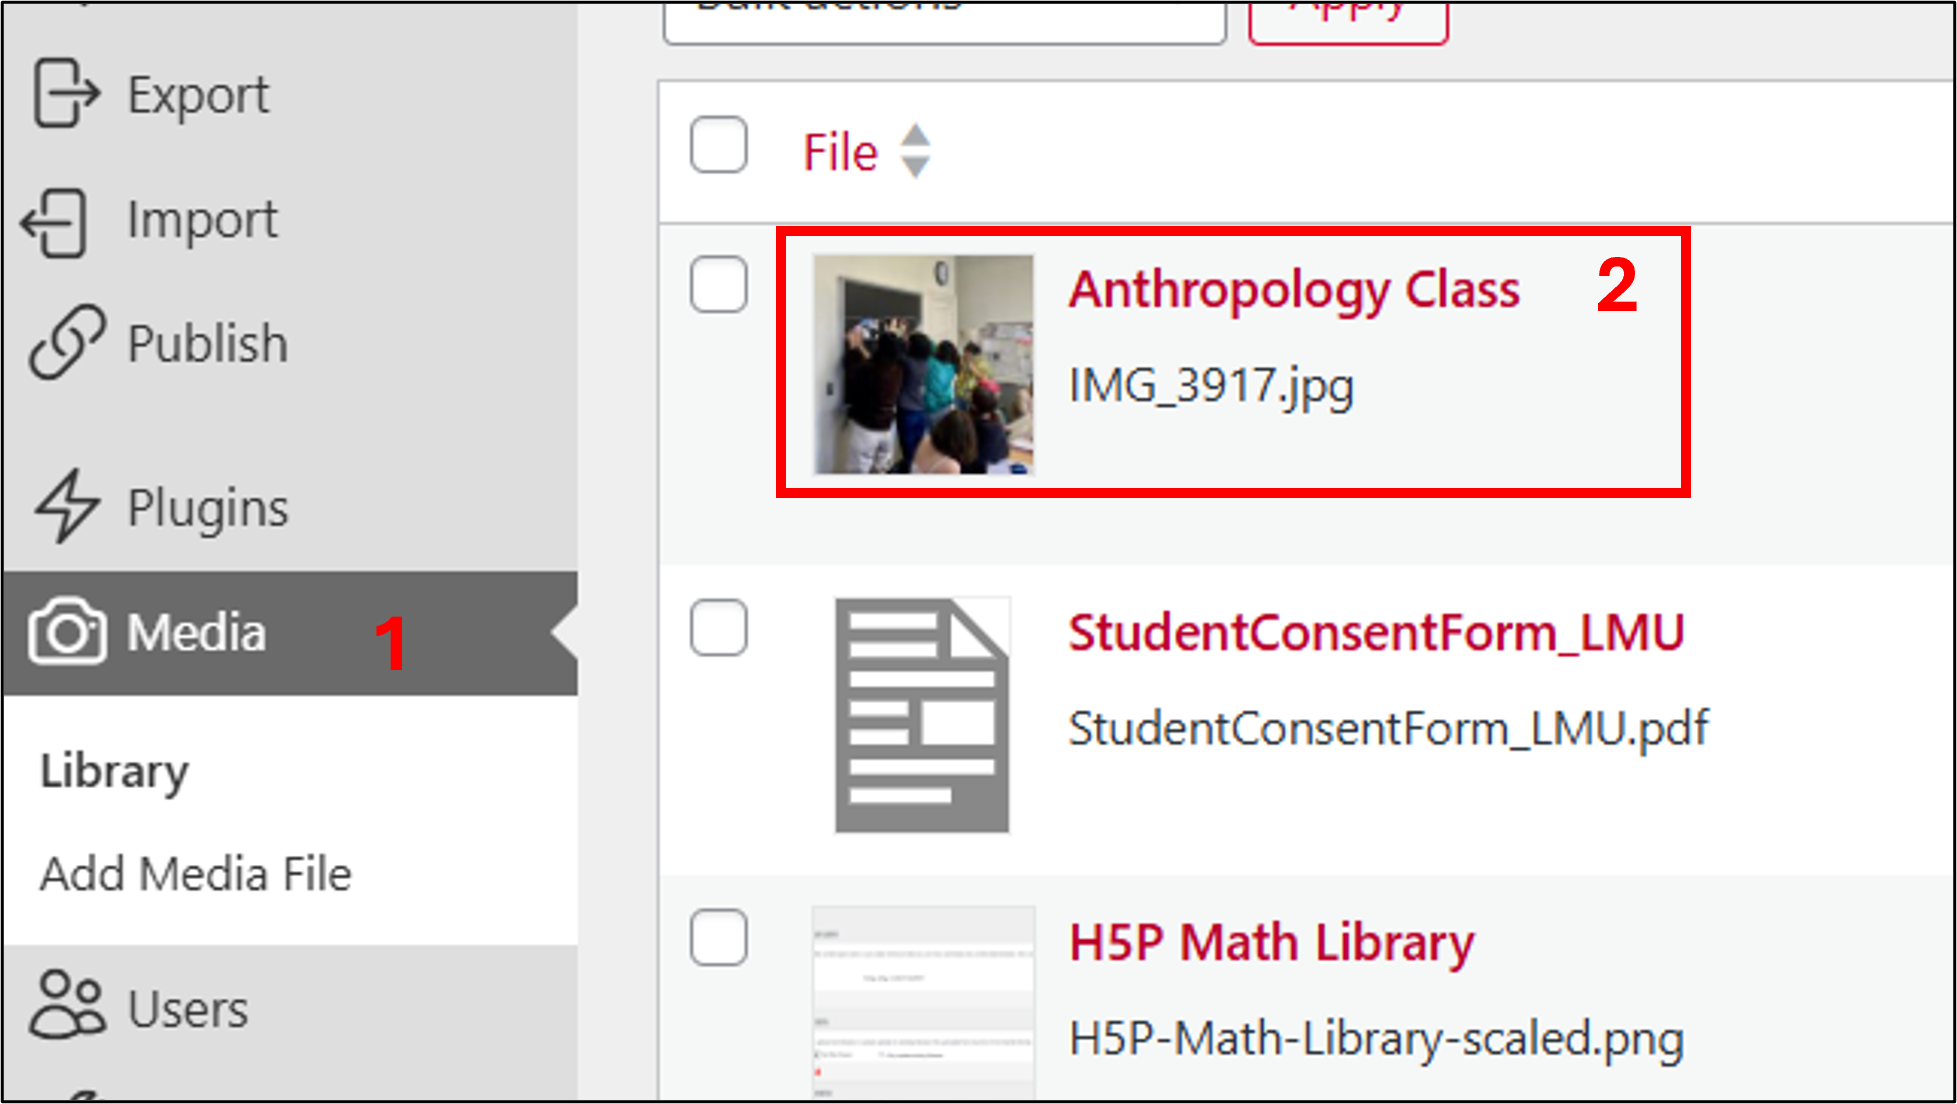
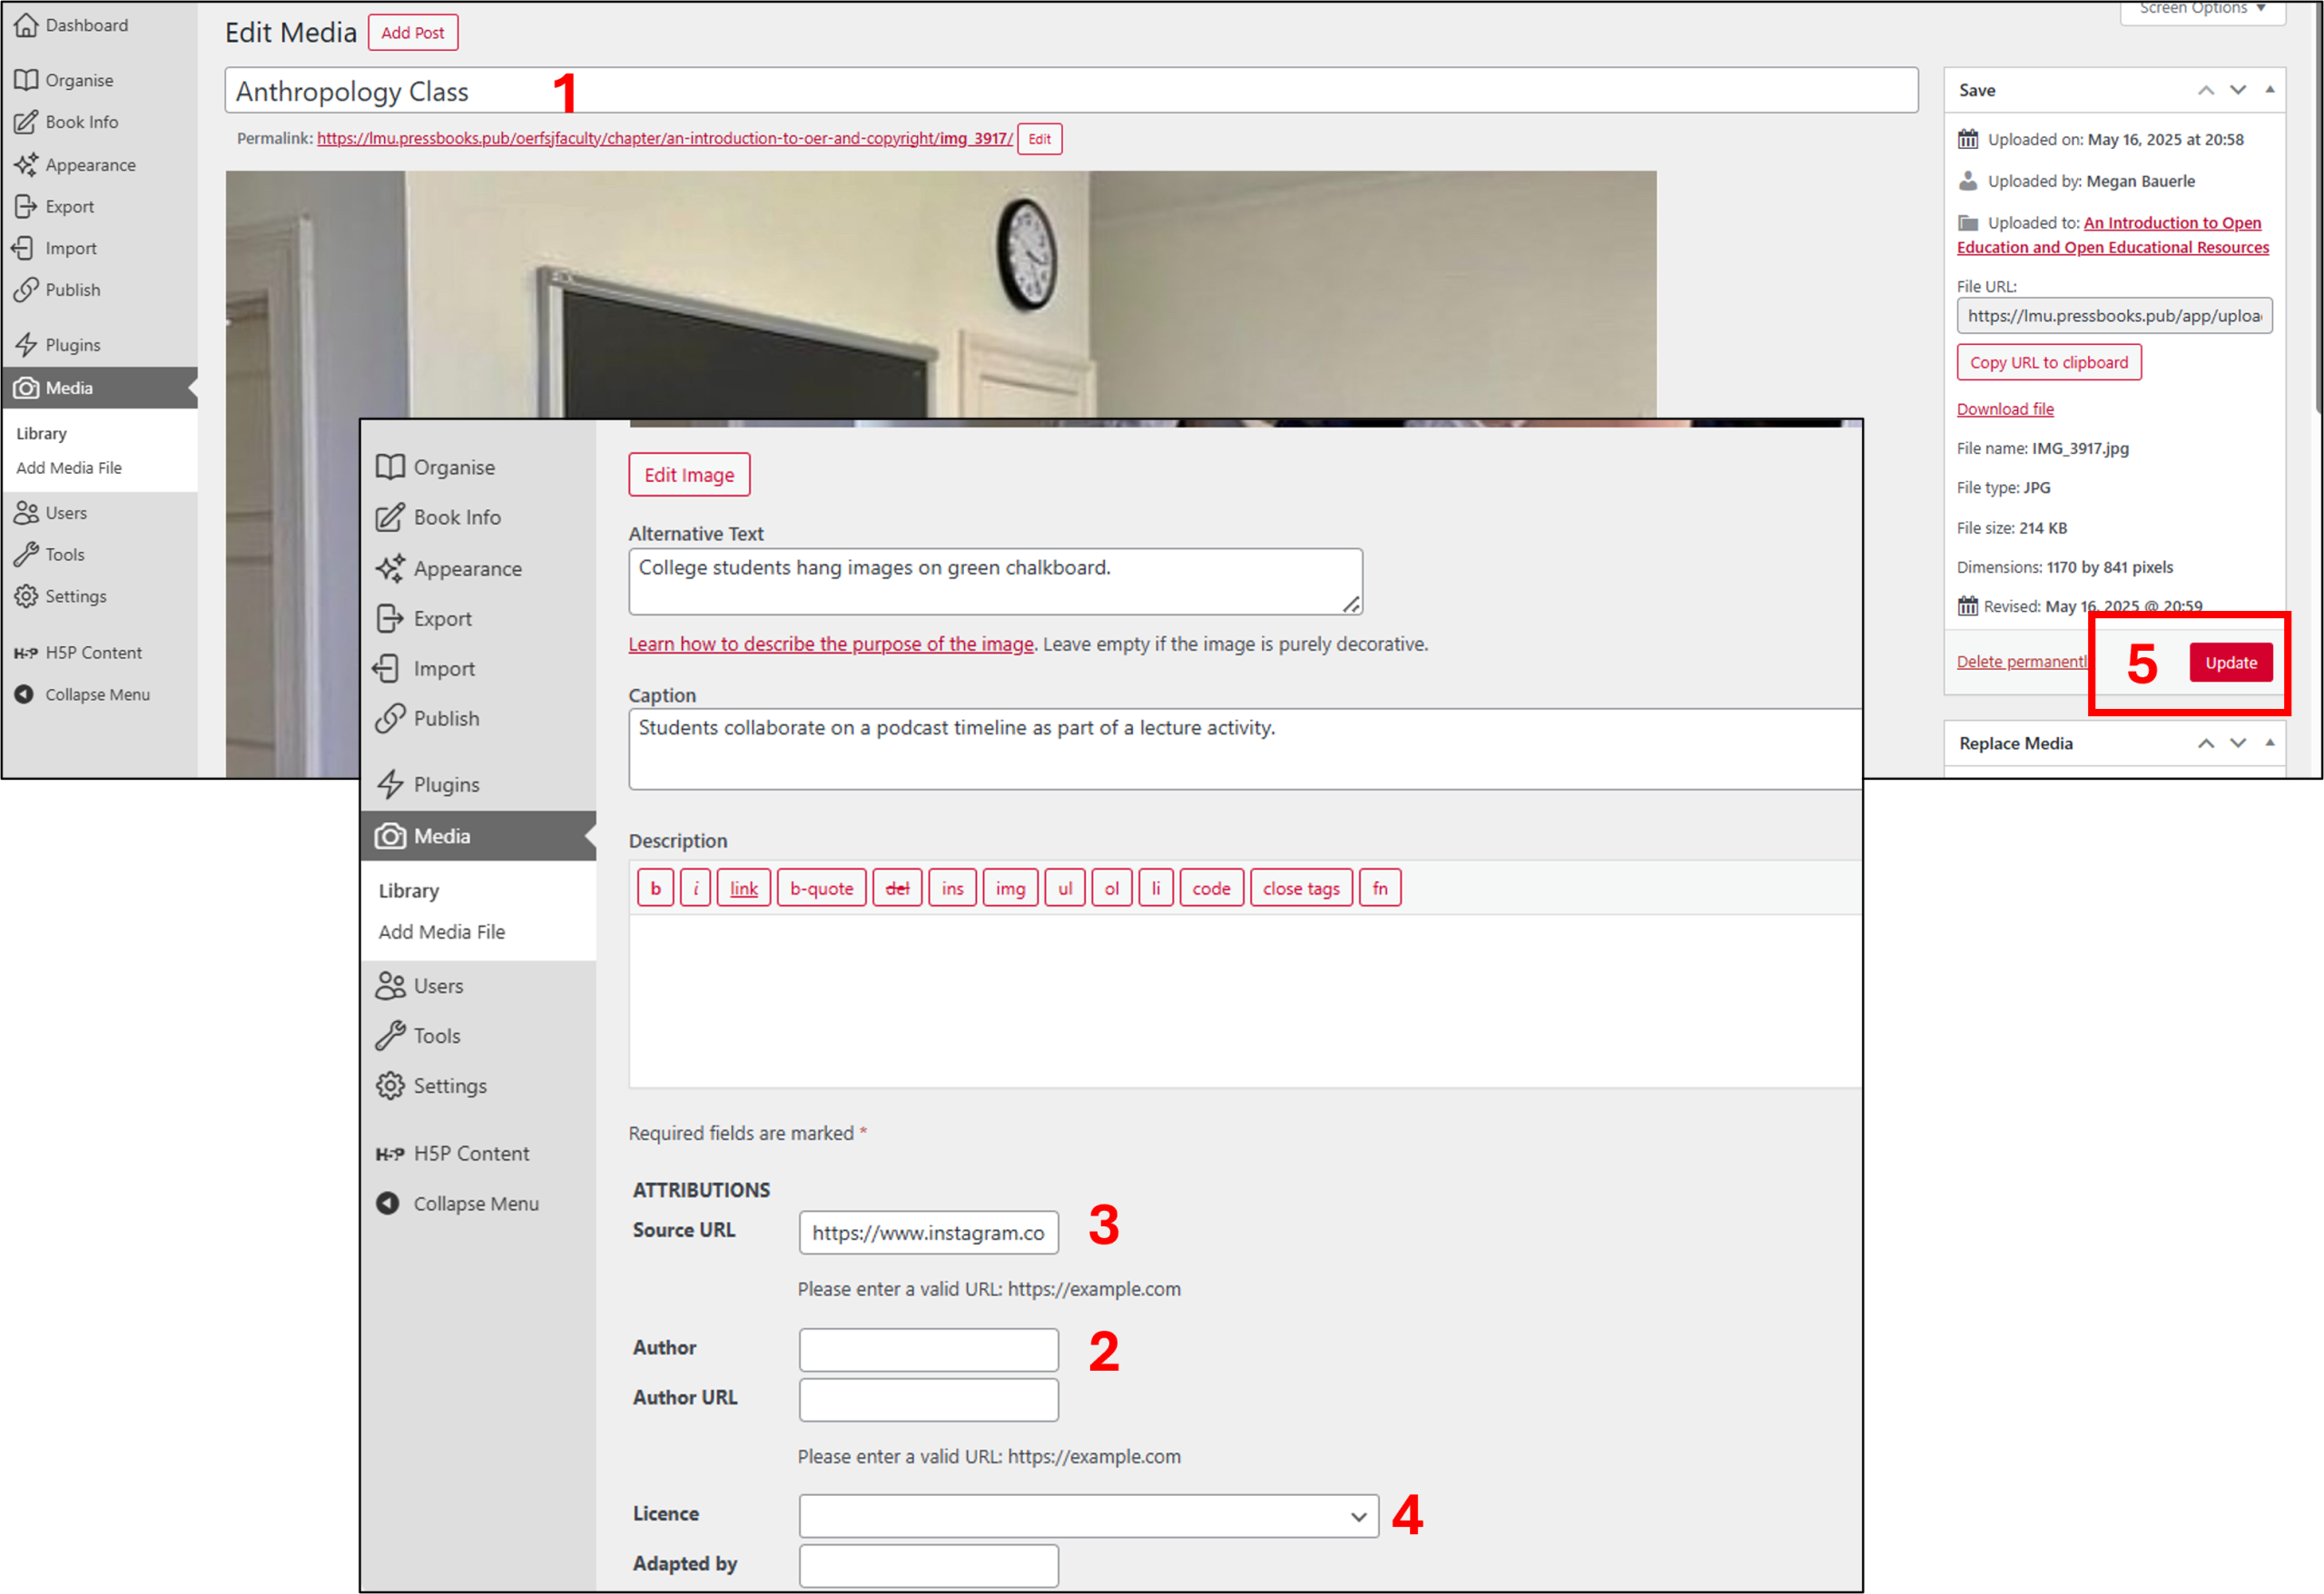
Q: How do I add a TASL (title, author, source, and license) to the metadata of an image?
A: In your Pressbook Dashboard, select Media from the left-side panel [1]. Find and select the image to which you wish to add a TASL [2].
Add or change the title [1], add the author’s name [2], the URL to the original source of the image [3], and select the image’s license from the drop-down menu [4]. Then, select Update to save the changes [5].
Advanced Questions
Q: I would like to use QR codes in my OER. What is the best way to create QR codes that are not temporary?
A: You can make QR codes with H5P. Since H5P is built into your Pressbook, and you’ll likely want to keep all of this in one place, I would recommend using H5P to create your QR code. This will also allow you to maintain/sustain the QR code link. In H5P, they are called KewAr. Once you create it in your H5P Library, you can place it on any page of your Pressbook as an H5P. Alternatively, you can also take a screenshot of it and bring in the image in your Media library. You can also print it off and use it digitally wherever you want, either as a screenshot image or an H5P.

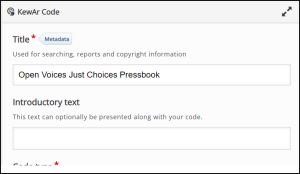
To create a KewAr H5P, you’ll need to give it a Title. You can add optional Introductory Text, if you like, to guide users as to its purpose.
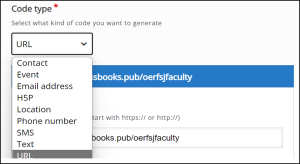
Next, you’ll choose the type of content to which the QR code will be tied from the drop down menu. As you can see from the image above, KewAr allows you to tie it to many different types of content. In the above example, I chose URL, as this QR code will be tied to the OERFSJ Faculty Handbook.
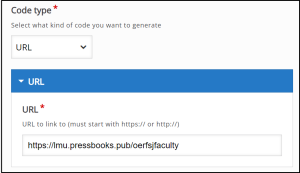
For whichever content you choose, you’ll be given a field to place information. For this example, I pasted in the URL to the OERFSJ Faculty Handbook.
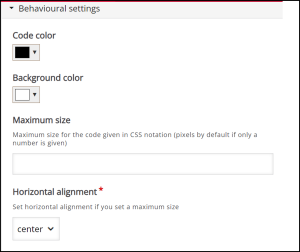
Finally, you can alter the Behavioral Settings, if you like, for things like the color, size, and alignment of the QR code.
 Note: You can view and play around with the above example in the H5P Content Library of the OERFSJ Pressbook Sandbox.
Q: How can you link to a figure when writing? For example, I want to link to the figure after my paragraph and I want the link to take users directly to the figure below the paragraph.
A: Yes, you can set anchors on a page in Pressbooks to enable your viewers to jump to or from a particular place on the page or to any other spot in your Pressbook. The Pressbook User Guide offers guidance for setting up Internal Hyperlinks (under Create Custom Internal Links Using Anchors).
Q: I am using a numbered list (1, 2, 3, etc.) that I want to continue (4, 5, etc.), but Pressbooks keeps starting my list over at 1. How do I fix this?
A: We created a short video showing how to alter one piece of html in your Text editor to fix this:
More on Formatting Ordered Lists from the Pressbooks User Guide
Q: How do I add space between lines of text?
A: We created a short video showing two ways to add space between lines of text in your Pressbook page:
Q: Pressbooks allows for adding numbered lists (1, 2, 3, etc.) and bulleted lists. Is there a way to add lettered lists or a mix of both?
A: Yes, with a few changes to the html in the Text editor, you can alter the way a list and its subpoints appear in your page. The Pressbooks User Guide offers guidance on formatting ordered lists.
Q: How do I embed an interactive graph or figure?
A: Pressbooks enables us to easily embed some common elements that require an iframe:
Typically, you could add the embed code to the Text (HTML) editor (the tab next to Visual on the top right of your editing screen).
If you want to embed interactive elements but notice the provided embed code is not working, we suggest using H5P Iframe Embedder. Within Pressbooks, select H5P Content from the navigation menu on the left. Select Add New at the top of the H5P Library. Then, find and select the Iframe Embedder type. There you can add the URL for your interactive figure and the display dimensions. The only restriction: the max width must be 720 px or less. The figure below has a width of 670 px with a max width of 720 px and a height of 525 px.
Q: How do I make subsections of a chapter appear in my Table of Contents?
This is known as a Two-Level Table of Contents, and it is a two-step process. View the video for step-by-step guidance.
For more information, see the Pressbooks User Guide under Global Options < Two-Level TOC.
Q: I like these arrows that hide or open to show more information on this page! How do I do that in my Pressbook?
A: Yes, using a little html, you can add these show/hide collapsable boxes to your page. This show/hide feature is a native HTML5 element called <details>, and it offers a simple, powerful way to make expanding text boxes in your Pressbooks web book.
The details element is very simple and starts and ends with the standard HTML tags: <details> and </details>. Whatever you type within the <summary>will be used as the label for the show/hide box. Here’s some sample code for a very minimal show/hide disclosure widget:
<details>
<summary>Show/Hide</summary>
This text is hidden at first but can be expanded by the user.
</details>
The code above would produce a disclosure widget that looks like this:
Show/Hide
This text is hidden at first but can be expanded by the user.
You can use this code by copying and pasting it into the Text editor of your own Pressbooks chapter. To change the label, simple edit the text between the two <summary> tags. To change the hidden text, edit the “This text is hidden at first but can be expanded by the user." text that follows.
Want to make these accordions stand out a bit more?
Consider adding a Alex’s Accordion CSS to your Pressbook. If you decide to change the font or background color in the CSS, use the color contrast tool to choose and adjust colors to ensure they meet accessibility requirements.
View the video to see how to add the Alex’s Accordion to your Pressbook. The CSS code is below the video.
Alex’s Accordion CSS
/* Alex’s Accordion */
details > summary {
padding: 6px 10px;
font-size: 1em;
text-indent: 0.5em;
background-color: #000;
color: #fff;
border: none;
cursor: pointer;
margin-bottom: 2px;
border-radius: 20px 20px 20px 20px;
}
details[open] > summary {
background-color: #000;
color: #fff;
}
.collapsed {
border-radius: 0 0 10px 10px;
background-color: #e8eff4;
padding: 10px 10px;
margin-bottom: 10px;
border-radius: 15px 15px 20px 20px;
}
/* # The Sliding Summary # */
@keyframes details-show {
from {
opacity: 0;
transform: var(–details-translate, translateY(-0.5em));
}
}
details[open] > *:not(summary) {
animation: details-show 750ms ease-in-out;
}
/* End of Accordion */
Note: When you first load the page, if your arrows are already open, showing all of the hidden information, you will need to take an additional step to have them remain closed upon loading the page.
 In the text editor, find and delete the <open=”open”> portion of the code. Then, Save your page. Now, your page will load with the arrows in a closed position.
Q: How do I force a link to open in a new window/tab?
Pressbooks allows you to edit whether or not a link opens in a new tab. Here is how:
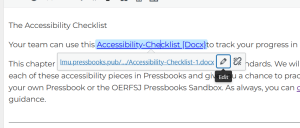
Step 1: Select the link and then select the pencil icon.
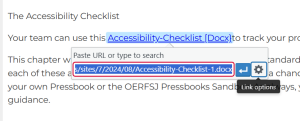
Step 2: Select the gear icon.
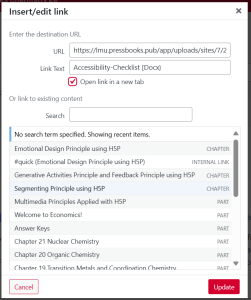
Step 3: Check the Open link in a new tab box. Then select Update.
Note: If a link must open in a new window or tab, the best practice is to include a textual reference.
Example: OER for Social Justice [New Tab] is available online.
Help with Pressbooks
No need to wait for answers or the next jam session. Use the link below to schedule a one-on-one meeting with Karna and Theresa for any support you need as you develop your OER in Pressbooks.
Contact us for One-on-One help
License and Attribution
“Pressbooks FAQs” by Theresa Huff and Karna Younger is partially adapted from “Show/Hide Boxes with Pure HTML [Details Element] – OER Activity Sourcebook” by Naomi Salmon, used under CC BY 4.0.
“Pressbooks FAQs” by Theresa Huff and Karna Younger is licensed under a CC BY 4.0.
