Developing Your OER
7.1 Smart Starts for OER Development
Theresa Huff
By the end of this chapter, you will be able to
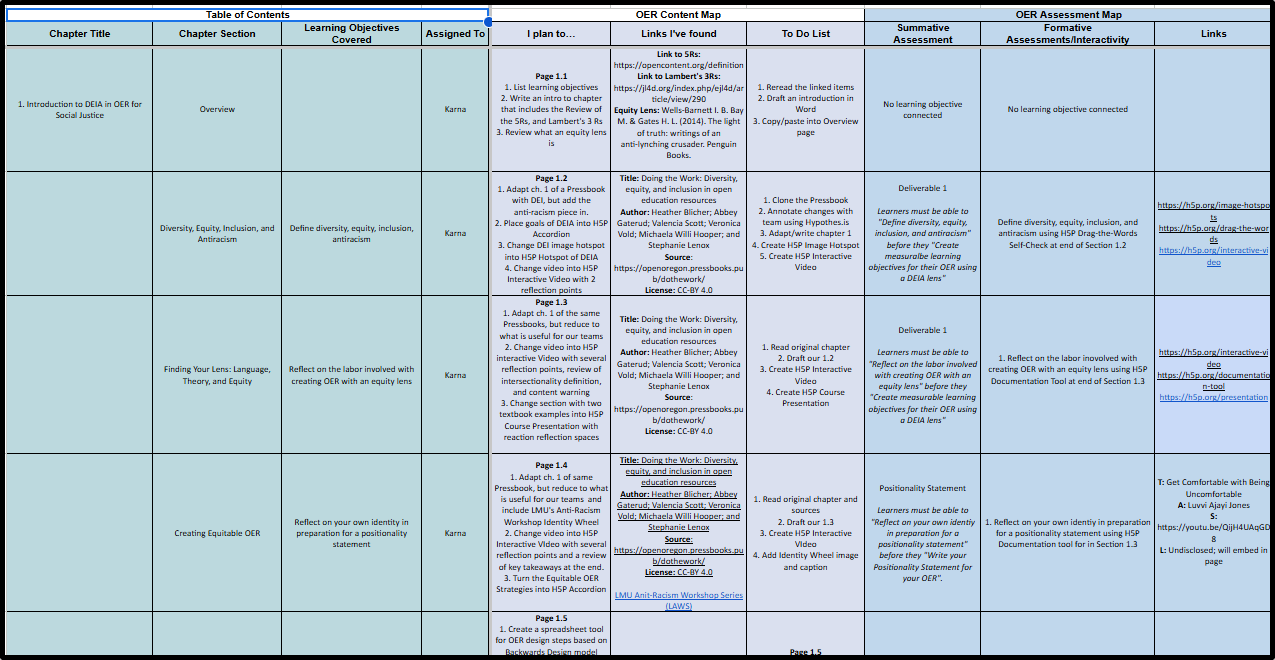
- Identify the importance of using the OER Content and Assessment Map to guide content creation and ensure alignment with learning objectives.
- Recognize best practices for naming conventions to effectively organize and manage OER files.
- Explain the importance of backing up OER drafts.
- Describe strategies for maintaining secure and accessible versions.
- Identify privacy settings in Pressbooks to control access during the drafting phase.
In the last year-and-a-half, you and your team have accomplished some amazing and foundational work. As a team, you have
- Reviewed existing OER content in your field. You’ve identified gaps in the existing OER and identified what needs to be added.
- Mapped out your own OER, aligning your learning objectives, content, practice (formative assessment), and your summative assessments in your course(s).
- Identified existing content (text, videos, images), interactivity, and review (simulations, H5Ps) you wanted to use.
- Planned out what you needed to create to fill the gaps.
- Created a project timeline to guide the development and implementation of your OER.
And now, you are ready to start developing (writing, creating, remixing) your OER! While the next few pages will guide you through designing the visual layout of your chapters, making decisions and tips for creating and remixing OER, ensuring your creation and remixing is focused on DEIA, and strategies for when you’re stuck in drafting and revising, this chapter is focused on making sure you are set up for success.
Before you Begin
The development phase of OER creation is when you finally get to start writing, creating, remixing, and seeing your ideas come to life. But, there are a few things to make sure of before you start into your development journey that will make this phase of OER creation less of a bumpy ride.
Use Your Roadmap
Once you start writing or remixing existing OER, it’s easy to get off track and wander into concepts or topics that were not in your plan. It’s understandable. The process of writing lends itself to new idea generation, and that OER you are remixing has some pretty cool ideas after all. While new ideas and new pieces of existing OER are all good, and you may end up using some of them, it is important to use your roadmap (your OER Content and Assessment Map) as your guide. Here are few reasons why:
- Your whole team created this cohesive OER, so if you change course and write about something not planned, you put your team’s work at risk and may even be writing about something they had planned to cover in their chapter.
- Remember those learning objectives? Your students need that content and practice in your chapter in order to be successful in the course. Wandering into territory you did not intend to cover, however lovely it is, can distract from the main focus of covering those learning objectives.
Roadmap tips:
Stick with your plan. Refer often to your team’s OER Content and Assessment Map as you write and remix.
Determine Naming Conventions

“Where did I put that chapter?”
“Oh, I saved that image somewhere…”
Creating and remixing an OER is a big project with lots of pieces involved. You have the additional challenge of working with a team of folks. That’s a lot of files and links to manage. Time and energy are in short supply, and nothing steals both more than hunting for and opening seventeen files all entitled “Untitled” on your hard drive to find that one draft you saved a few weeks ago. So, before you begin developing, saving, and sharing your files, as a team, come up with a standard naming convention that you will all use to save, store, and manage your files.
To ensure your files are organized and usable, now and years from now, consider implementing some of the following file naming conventions:
Naming Convention Tips
Include the following elements in file names:
- Project name/acronym (OERFSJ)
- Brief description of content
- File creator’s last name or initials
- Date file created/generated (in YYYY-MM-DD format)
- Version number (with leading zeroes)
- Use underscores (_) between words instead of spaces between words
- Capitalize the first letter of a word (called camel casing)
Confusing File Name: Final_Draft_Updated_ReallyFinal.doc
Clearer File Name: OERFSJ_Ch1Draft_Huff_2025-01-23_v03
Back It Up
Backing up your OER drafts as you write and remix is one of those habits that can save you a lot of stress down the road. Whether it’s a tech glitch, a misplaced file, or an accidental overwrite, things happen — and losing hours (or days!) of work isn’t fun — or inexpensive — for anyone. Keeping backups isn’t just about avoiding disasters; it’s also a great way to stay organized and track your progress. Plus, if you’re collaborating with others, having clear, saved versions of your work makes it easier for everyone to stay on the same page.
Tips for Backing Up Your Files
- Use cloud storage: Save your work to your team’s Google folder or Box make it easy to access your drafts from anywhere while automatically saving changes. Aim to store duplicate copies in three locations.
- Set up auto-save features: Most modern tools, like Word or Google Docs, offer auto-save functions — turn them on and let the software work for you.
- Save local copies regularly: In addition to cloud storage, keep a copy on your computer or an external hard drive for extra security.
- Name your files clearly: Use version numbers or dates (e.g., “OER_Draft_v1” or “OER_Remix_2025-01-23”) so you can quickly find the latest version.
- Schedule backup time: At the end of your work session, take a minute to check that everything’s saved in the right places — it’s a quick habit that pays off.
Create a Private, Creative Space
If and when you are drafting directly in your Pressbook, you will want to ensure your workspace is hidden from students and others outside your team as you draft. Pressbooks makes it easy to toggle the privacy level of your entire book or just the chapter on which you are working.
Change the Visibility of Your Pressbook
If you want the entire Pressbook to be hidden from public view while you draft, you can change the global privacy setting from public to private using the Book Visibility setting.
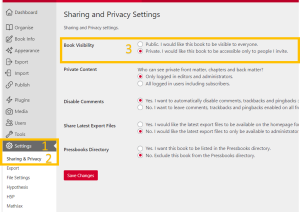
Directions: Under Settings [1] in your Pressbooks Dashboard, select Sharing & Privacy [2]. Under Book Visibility [3], select the radio button next to Private, I would like this book to be accessible only to people I invite. Then, select Save Changes.
If you want to hide some chapters of your Pressbook from public view while you draft, you can change the chapter-level privacy setting by toggling off the Show in Web setting.
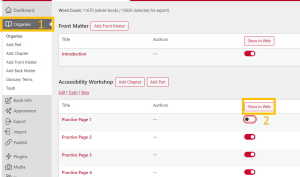
Directions: Under Organize [1] in your Pressbooks Dashboard, find the chapter you wish to hide. Under Show in Web, select the toggle button [2] to hide or show. If the toggle is red with a white circle on the right, the chapter is visible. If the toggle is white with a black circle on the left side, the chapter is hidden.
Are you all set? Test your knowledge of the best practices for getting started in your development phase by interacting with the H5P Quiz below.
Next, we’ll discuss using your map to structure your OER and add what you already have.
Licenses and Attributions
“Smart Starts for OER Development” by Theresa Huff is licensed under CC-BY 4.0.
