Making the Garden Accessible
Checking Your Pressbook for Accessibility
Theresa Huff
Learning Objectives
Create and offer your OER in alternate formats, including EPUB and PDF.
What are alternate formats?
Alternate versions of your OER Pressbook can be created in several formats, including:
- PDF (for print)
- PDF (for digital use)
- EPUB
Note: Alternate formats is not the same as alternate content. The format of the content may change (for example from digital to print), but your content remains the same.
For whom are you doing this?
This work supports students who:
- Are blind or have low-vision
- Prefer the ability to highlight, note take, or bookmark
- Prefer listening to the text
How does that work? – Alternate Formats of an OER Pressbook
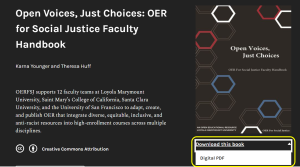
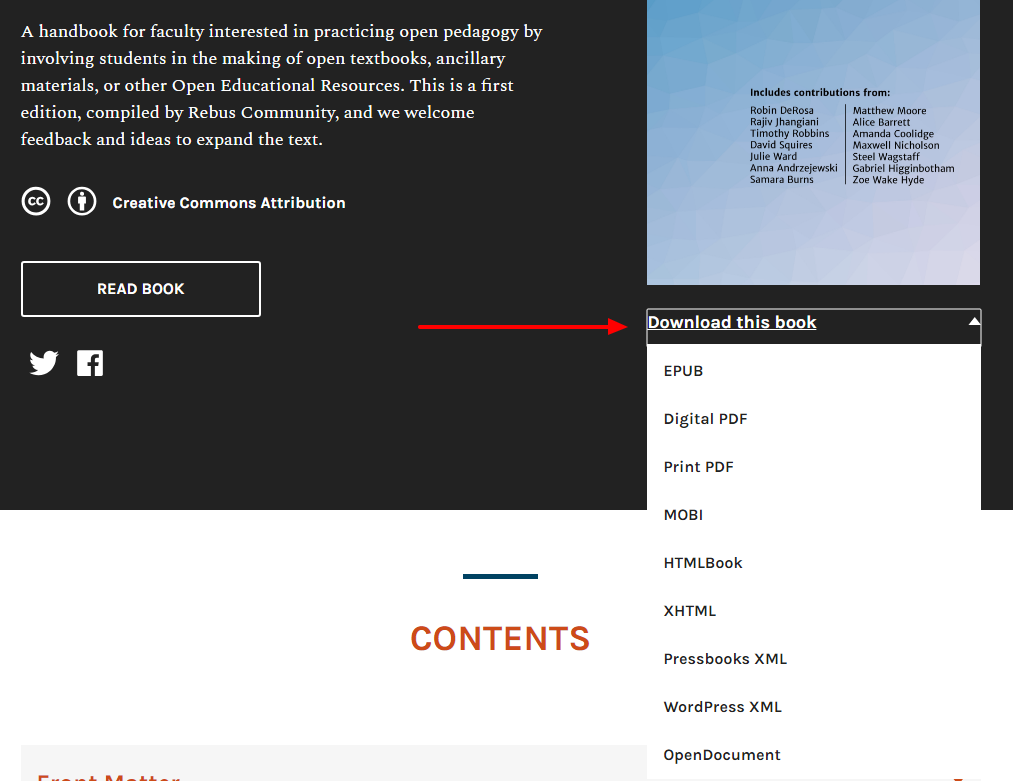
When learners arrive at the home page (or cover) of your OER Pressbook, they can select Read Book to read and interact with the webbook. When offered, they can also choose an alternate format from the Download this book drop down menu under the cover image.
Why is this important?
The unique needs and preferences of your learners can vary. For this reason, offering alternative versions of your OER Pressbook is important for supporting your learners. According to the Universal Design for Learning (UDL) guidelines, offering different formats of your content supports representation by allowing learners to customize the content for themselves. For example, offering your content in an EPUB format allows an institution’s disability services to customize the content in braille for blind or low-vision learners. It also supports UDL’s guidelines for supporting action and expression by varying and honoring the learner’s unique needs for navigating through the content. For example, offering a PDF version of your OER Pressbook allows learners the option of highlighting or marking up the PDF to help them recall and locate the information for themselves. Additionally, offering an audiobook version of your OER Pressbook could support blind, low-vision students, students who commute for work or school, or any student who prefers to listen to the content rather than read the text.
What do you need to do?
Accessibility Checklist: Alternate Formats
o The OER is offered in alternate formats, including EPUB and PDF.
Pressbooks allows you to export (or publish) your book in several alternate formats. Once exported, your learners and others can download the alternate versions from your OER Pressbook home page. Besides the default webbook format that you are currently using, Pressbooks supports three different export file formats. They include:
- Print PDF
- Digital PDF
- EPUB
There are two steps to make your alternate versions available.
Step 1: Create an export
To produce an export for your book:
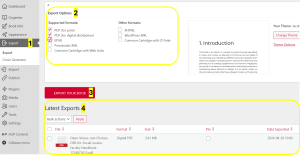
Select ‘Export‘ from the left sidebar menu [1]. Next, from the Export Options [2], select the boxes of the formats you wish to make available (i.e. PDF for Print, PDF for digital distribution, and EPUB). Now, select ‘Export Your Book‘ [3]. The alternate formats will now appear under Latest Exports [4] at the bottom of the page.
Note: Before making your alternate formats available for your learners, you will want to download and review them for any formatting errors. Occasionally, some formatting errors can occur for various reasons.
Pressbooks also allows creators to make changes to the format of your webbook, PDF, or Ebook, if needed.
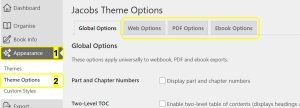
You can find these allowed changes by selecting Appearance [1] and then Theme Options [2]. At the top of the page, you will see tabs that allow you to make changes to alternate formats of your OER Pressbook, including Web options, PDF options, and Ebook options. The Pressbooks User Guide offers guidance on the setting for EPUB (EBook) and PDF.
If you need help troubleshooting formatting issues with your exported OER Pressbook, please contact Karna and Theresa for help.
Step 2: Make exports available on home page
Now that you exported the alternate formats of your OER Pressbook, you will need to make them available to your learners and others.
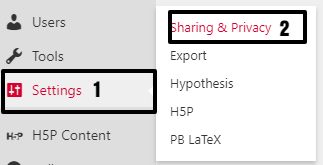
Select Settings [1] and then select Sharing & Privacy [2] from the menu at the left of your screen.
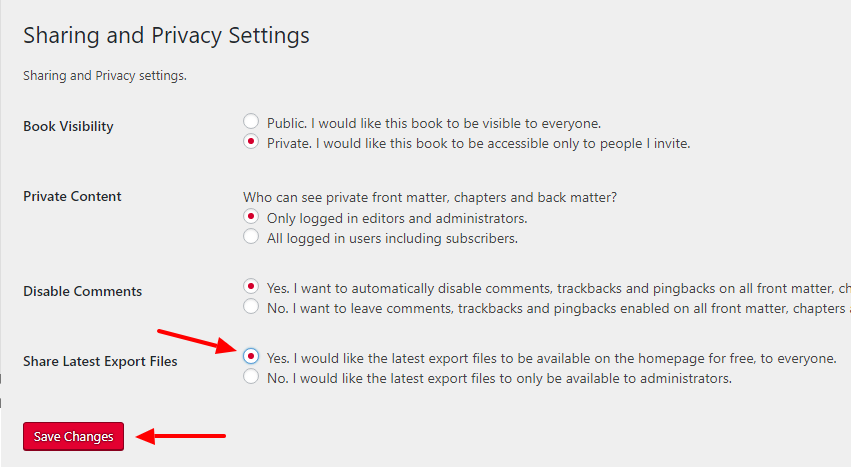
Next, scroll down to Share Latest Export Files and select Yes. I would like the latest export files to be available on the homepage for free, to everyone. Then, select Save Changes.
Once you have done this, the latest version of any export files produced for your book will be available for download on your book’s home page.
Licenses and Attributions
“Alternate Formats” by Theresa Huff is adapted from “Pressbooks User Guide” and “The Pressbooks Network Manager’s Guide” by Pressbooks, used under a CC BY 4.0 license. “Alternate Formats” is licensed under CC BY 4.0.
There are several tools and ways to check your Pressbook to ensure it meets the accessibility standards.
Review the Accessibility Checklist [Docx]
WAVE Accessibility Checker
The WAVE accessibility checker is simple to use and gives rich feedback on the accessibility of your Pressbook. Simply paste the URL of your Pressbook into the WAVE tool, and you’ll be provided with icon-led feedback and guidance about your Pressbook’s accessibility.
View the video to learn how to use WAVE.
Inspecting the Code
Your Pressbook (and all web pages) have a hidden, back-end made up of code. Don’t worry – you don’t have to learn to code to use this option of checking accessibility. By right-clicking on parts of your Pressbook and inspecting the code, you can see if your Pressbook is set up for accessibility.
View the video or read the text below the video to see the steps for inspecting the html code for accessibility of your Pressbook.
Inspecting Headings and Organization
You can easily check your Pressbook or any digital page (including websites) to see if the Headings style is being used rather than just a larger font or bold formatting.
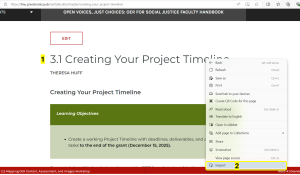
First, hover over the text that should be a Heading and right-click [1]. Then select Inspect [2].

An inspection panel will appear on the right side of your screen [1]. This panel shows the html or code side of the interface. Find the shaded portion, which corresponds to the text on which you right-clicked [2]. Notice the h1 at the beginning and ending of this shaded portion. h1 means that this portion of text is using Heading 1. Therefore, you can confirm that this text is using the Headings setting rather than just a large and bold font.
If you continue to look down the inspection panel, you will see another Heading being used, h2 [3]. h2 stands for Heading 2. Because it falls below the Heading 1 (h1) in the page, you can confirm that it is following the correct heading hierarchy.
Inspecting Images
While you can easily check for figure captions and image descriptions in your Pressbook, the alt text is hidden from view.
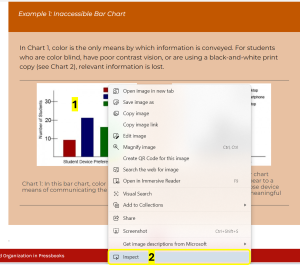
To inspect an image for Alt Text, right-click the image [1] and select Inspect [2].
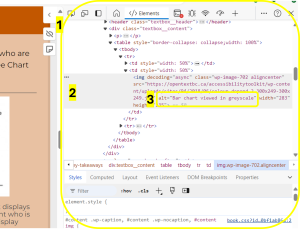
An inspection panel will appear on the right side of your screen [1]. This panel shows the html or code side of the interface. Find the shaded portion, which corresponds to the text on which you right-clicked [2]. Look for the word alt, which shows alt text has been added. The words in quotes that follow alt are the alt text [3].
If no alt is found, then this image does not include alt text.
Inspecting Tables
While you can easily check for table captions and merged or split cells in your Pressbook, you cannot surmise whether a table in Pressbooks is using row and column headings or whether the creator simply used a bold setting for the text in those cells. You also cannot tell if the scope was properly set or not.
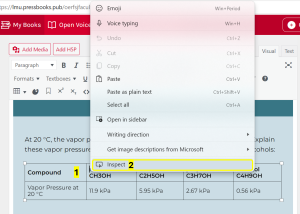
To inspect a table for column and row headers and correct use of scope, right-click the cell that should be using a header [1] and select Inspect [2].
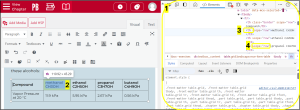
An inspection panel will appear on the right side of your screen [1]. This panel shows the html or code side of the interface. Find the shaded portion, which corresponds to the text on which you right-clicked [2]. Look for the letters th, which stands for table header to see if table headers have been used for the proper cells [3].
Next, look for the word scope next to the th to see if the scope has been set [4]. If the selected cell is part of a row, you should see scope= “row”. If the selected cell is part of a column, you should see scope= “column”.
If no th and scope is found, then this table does not include headers or scope, and is inaccessible.
Manual Review
There are a few accessibility checks that must be done manually. These include checking for transcripts, captions, audio descriptions, looking for accessible formulas, and looking at the front and back matter of your OER for an Accessibility Statement.
Captions
Media captions provide a running transcription of audio content that is synched up to an audio or video file. As 3PlayMedia notes, machine-generated automatic media captions are often about 80% accurate. This means that they need manual review and editing by a person in order to provide equitable access.
To assess the quality of media captions, watch or listen for a few minutes with captions turned on. Typically, names, dates, locations and complex vocabulary words need to be manually edited. If you see typos or misspellings in media captions that don’t align with the audio you hear, it’s likely that they have not been edited for accuracy.
What to do if captions are missing or inaccurate
Your team can request that multimedia content creators generate and edit media captions for accuracy. If this request is denied but the media is openly licensed and allows derivatives, please contact the OERFSJ Project Team.
If the media is all rights reserved and content creators do not grant permission, the revising author will need to find other accessible media as a substitute.
Transcripts
If the video is hosted in YouTube, select the link and view it in YouTube. Scroll down below the video to see if a Transcript is available for the video [1]. Select Show transcript and listen to a few minutes of the video to see if the transcript matches the audio [2].
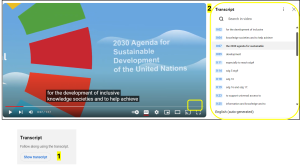
If the transcript is missing, you will need to enable a transcript in YouTube or create a transcript and link it in your Pressbook under the associated video. If the transcript has typos and it is your video, you will want to edit the typos to match the audio content.
What to do if there is no transcript or if it’s inaccurate
YouTube has a new transcript function that allows users to view and download the full transcript of a video. If the transcript is inaccurate, we’ll follow the same steps as above.
Audio Descriptions
Videos require manual review to determine if they need audio descriptions. Audio descriptions are unnecessary if the audio of the existing video presents necessary visual descriptions for understanding pertinent content.
To assess this, listen to the video with your eyes closed. If you understand and can visually imagine what is going on in the video, then no audio description will be needed. However, if some of the visual context is left out and requires you to look at the video to understand the context, audio descriptions will need to be added.
Formulas
Formulas should be written in MathML math language (if stand alone and complex) or in LaTeX math language (if found in the middle of a paragraph or sentence). It is not recommended that formulas be in another math language or be captured in an image.
To check formulas to ensure they are accessible, right-click on the equation or formula.
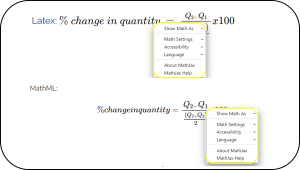
If the formula is in an accessible format, the MathJax accessibility support will appear.
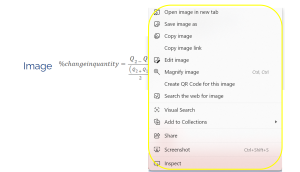
If the formula is an image or another inaccessible format, the web support window will appear.
Accessibility Statement
All OER created under the OERFSJ grant are required to include an accessibility statement in either the front matter or back matter of the OER.
To assess this, look in the front matter and back matter of your OER and ensure the accessibility statement is present. If present, check over the list of information required for an accessibility statement and ensure it is complete.
Note: Remember that ensuring an OER is accessible takes a team effort. Reach out to the OERFSJ project team [New Window] for help in creating and reviewing accessibility in your OER.
